


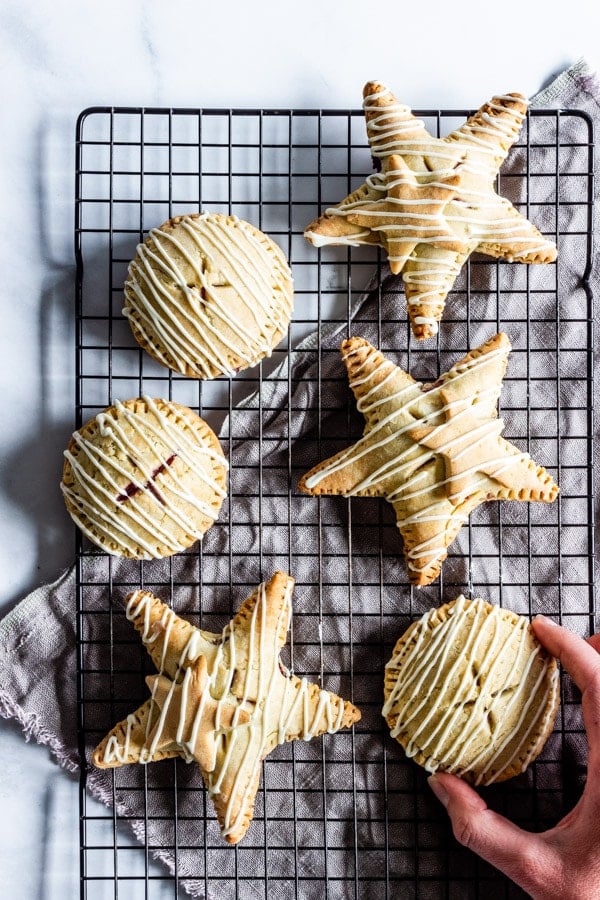
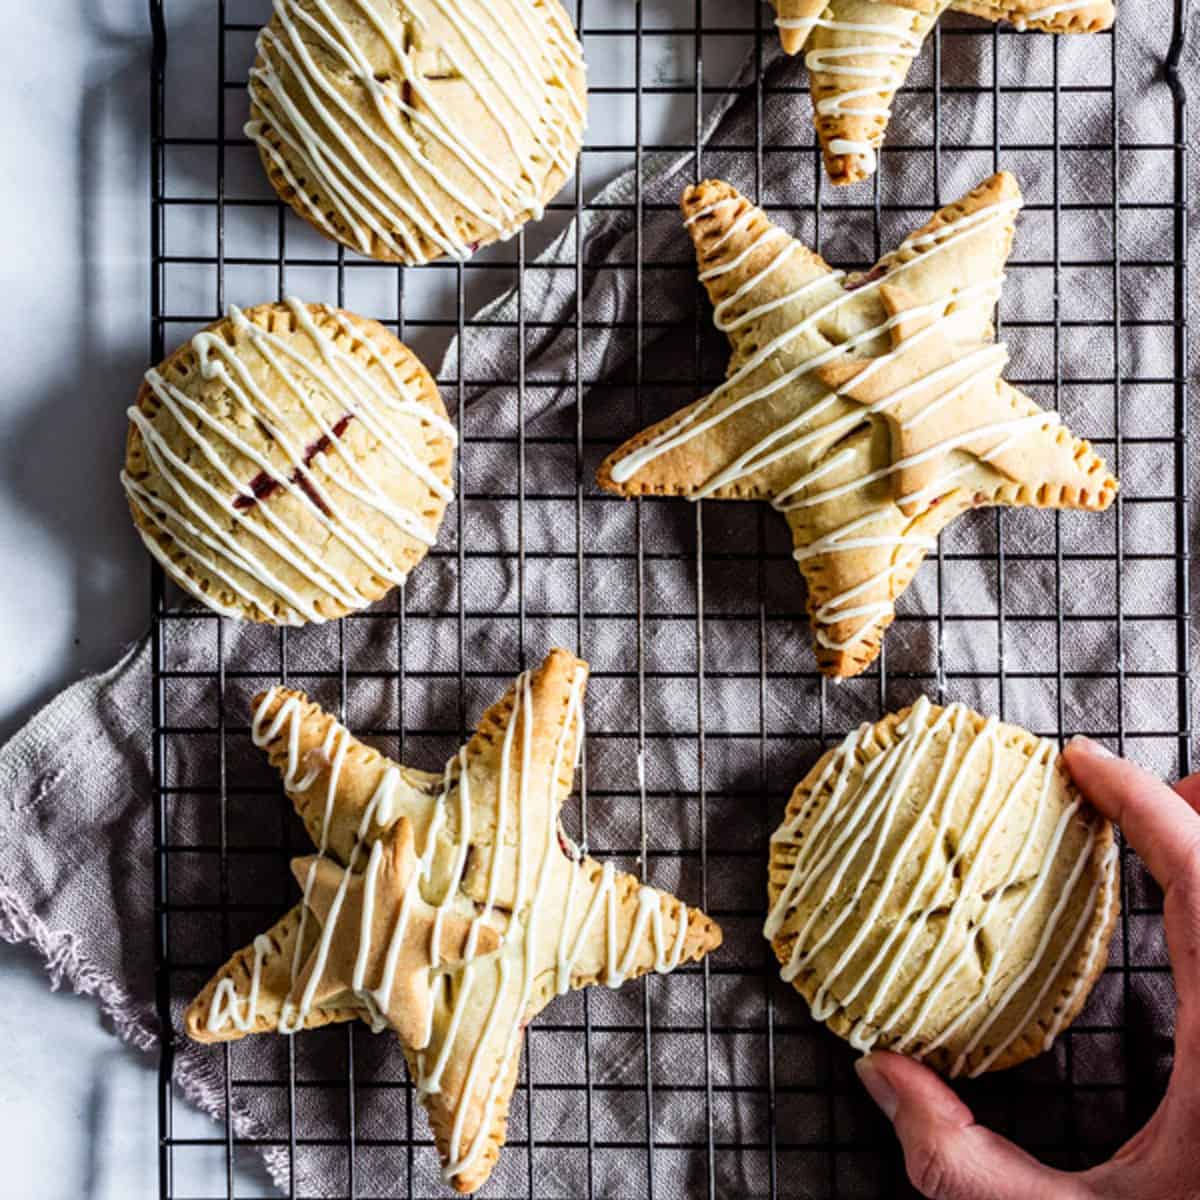
Homemade gluten-free hand pies are filled with a simple Instant Pot raspberry jam (or jam of your choosing) and baked between two sheets of flaky gluten-free pastry dough. A drizzle of white chocolate on top completes this perfect treat!
THIS POST IS SPONSORED BY THE
OREGON RASPBERRY AND BLACKBERRY COMMISSION
Ra-Ra Ah-Ah-Ah Raspberry Hand Pies...with white chocolate drizzle. Nothing bad about this romance.
Berry season is nearing and I can hardly wait. So I'm not.
Frozen berries are a freezer staple in my home. A treasured stash tucked away for when I'm craving a taste of summer, over and over again.
I am counting the days though until I can haul my kids out to the berry fields this summer. I slather them in sunscreen, give them a pep talk on how many buckets we are aiming to fill while reminding my younger daughter that most berry farms don't look kindly on berry pickers who have an all-you-can-eat outlook...until after the berries have been paid for.
My kids have now grown accustomed to and even expect me to uphold our annual summer berry picking outings just as we have done each summer since they were teeny tinies. But even in the name of tradition, the kids (and the berries) only last for so long out in the berry fields under the summer sun. The heat eventually sucks my kids dry of energy and the pep talk no longer seems to motivate them even when I explain the joys and possibilities of taking home mounds of berries.
And fresh berries only last so long too. They are either devoured in what feels like less time than it took to pick them or the berries reach that critical point where they need to be used in a dish or frozen for later.
And let's be honest, freezing caneberries (any berry that grows on a cane like blackberries and raspberries) can be problematic. I prefer to gently rinse my berries by placing them in a colander and dipping them into
Such is the dilemma.


My patience and my longings for tasty berries can't wait for the passing of a whole year before berries are in season again. So I'm not.
And really, why wait when Oregon berry farmers can be relied upon for high-quality caneberries?! The raspberries I reach for when fresh off-the-vine raspberries aren't an option (and when I'm concocting an excuse to celebrate the day with a hand pie) are picked at the peak of ripeness and frozen within 24 hrs, locking in maximum taste, juiciness

So I take full advantage of this privileged access to and year-round availability of sweet, tasty raspberries. I love supporting my local caneberry farmers and I love eating raspberry hand pies in season and "out" of season. I'm not shunning all the good things that come with eating seasonally but I also have no intention of becoming a seasonal elitist should someone offer me a gluten-free raspberry hand pie with white chocolate drizzle any season of the year.
Who could say no to a homemade raspberry hand pie because it's the "wrong" season?! Pish posh (<-- sorry, I don't know where that Mary Poppins-ism just came from). Frozen raspberries are ALWAYS in season.
Raspberries tucked into a flaky, buttery gluten-free pie crust?! With white chocolate drizzle?! I'm dead from glee. These are a major upgrade from the gelatinous fruit hand pies I used to covet and watch my elementary school pals eat in the 80s.

While these raspberry hand pies might look complicated, they really aren't. The gluten-free pie dough is straightforward and dependable. It's been a number of years since gluten was a part of my life but I feel confident that this gluten-free pie dough will leave pie eaters second guessing if it is truly gluten-free. It's quite perfect, in my humble pie opinion.
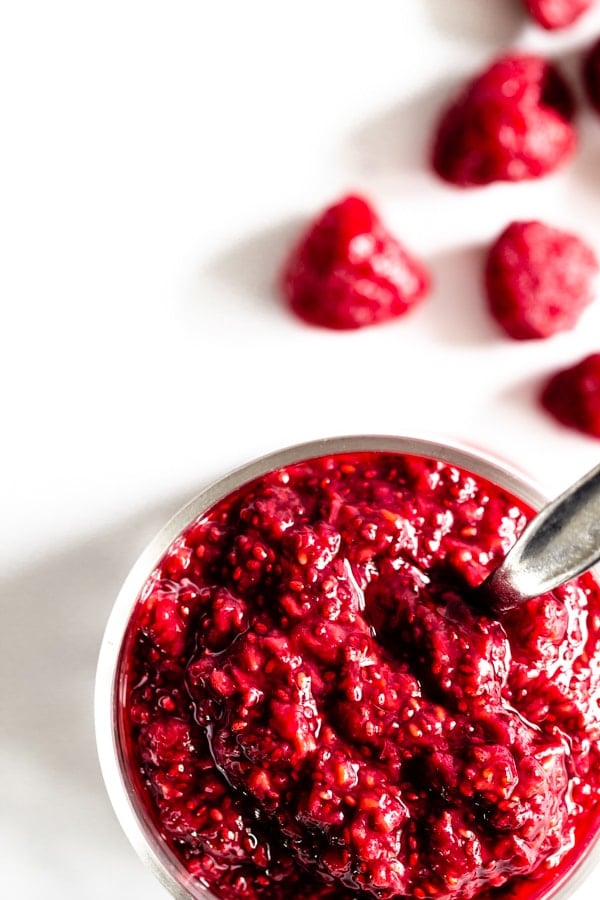
And the raspberry filling really could not be any easier. Remember this Instant Pot Blackberry Chia Jam? Easiest of all homemade jams is making an appearance again. This time with frozen raspberries. But blackberry hand pies with white chocolate drizzle would be just as dreamy. Perhaps two batches of hand pies are in order.
No instant pot? No worries. Your favorite raspberry jam (store-bought or homemade) will be perfectly wonderful as well.

Go traditional with round hand pies or make into fun shapes like stars for the 4th of July, hearts for Valentines Day, flowers for a birthday party. These hand pies don't discriminate.
Kids and adults alike will line up with hands outstretched. Then watch smiles spread across their faces as they hold their very own pie.

Here's to living our best life of pie.
ALL. YEAR. LONG. (raises gluten-free raspberry hand pie up in the air in solidarity)

And feel free to go heavier on that white chocolate drizzle. ♡
More tasty berry recipes!


Follow along!
Subscribe to my newsletter and follow along on Instagram, Pinterest, and Facebook for more tasty recipe inspiration!
Did You Make This Recipe?
If so, I'd love to hear about it! Leave a comment and a star rating below! I greatly appreciate your feedback and it is also so helpful for other PMST readers who are thinking about making the recipe. Remember to snap a photo and tag @passmesometasty on Instagram so I can see!
📖 Printable Recipe Card
Gluten-Free Raspberry Hand Pies with White Chocolate Drizzle
Ingredients
Instant Pot Raspberry Chia Jam
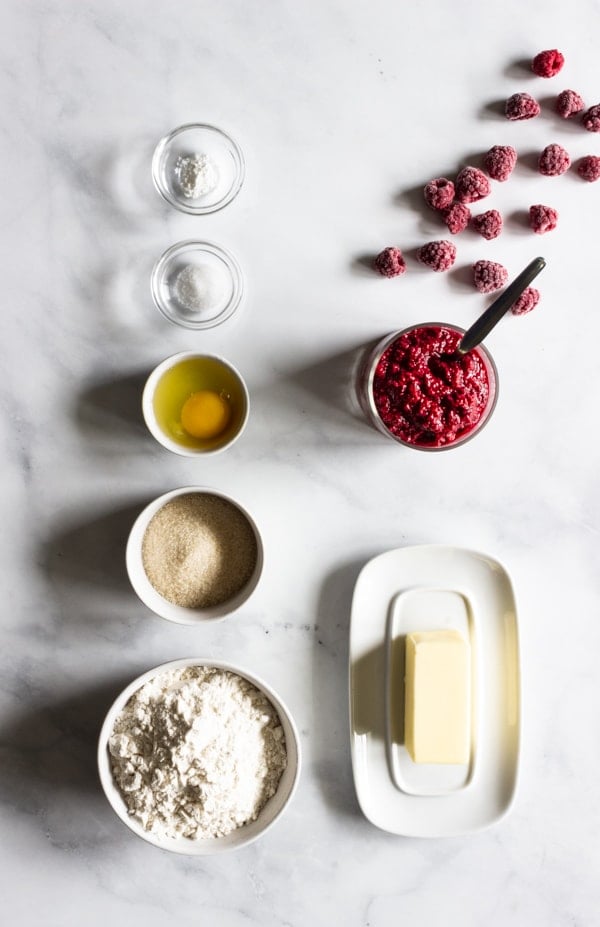
- 4 cups frozen Oregon raspberries
- 2 tablespoons pure maple syrup
- 2 tablespoons lemon juice
- ⅓ cup chia seeds
Hand Pie Dough
- 1 ½ cups Bob's Red Mill Gluten Free 1-to-1 Baking Flour
- ¼ cup sugar
- ½ teaspoon kosher salt
- ⅛ teaspoon baking powder
- ½ cup frozen or very cold, unsalted butter
- 1 egg beaten
- 4-6 tablespoons ice water
- heavy cream or milk
White Chocolate Drizzle
- 2 oz white chocolate or white vanilla-flavored melting wafers (or more depending on how much drizzle you like!)
Instructions
Instant Pot Raspberry Chia Jam
- To an Instant Pot, add frozen raspberries, maple syrup, and lemon juice. Stir briefly to coat the berries.
- Close and lock the lid on the Instant Pot. Position the steam release handle to Sealing. Press the Pressure Cook function (or your IP might say Manual instead) and use the [+] or [-] button to set pressure cooking time to 1 minute. Press the Pressure Level function to set the cooking pressure to High.
- Once finished cooking, allow the Instant Pot to naturally release for 10 minutes. Then turn the steam release handle to the Venting position to release any additional steam until the float valve drops down. Press Cancel, turn the Instant Pot off and remove the lid.
- With a fork or a potato masher, mash the berries until you've reached desired consistency. (I like my jam a little more on the chunky side.)
- Add chia seeds and stir quickly to incorporate and to prevent the chia seeds from clumping. You'll notice within minutes that the jam will begin to develop a thicker consistency as the chia seeds unleash their magic and turn the berry mixture into jam! Allow the jam to rest for 15 minutes or so.
- Transfer jam to a mason jar or desired storage container and place in the refrigerator to finish cooling. I allow my jam to rest in the fridge for about an hour before using because this allows the chia seeds to break down and become soft (versus crunchy) while also creating an even thicker, tasty jam-like consistency.
Hand Pie Dough
- In a large bowl, whisk together flour, sugar, salt, and baking powder.
- Using a cheese grater or food processor with a grater attachment, grate frozen butter. With a fork, gently mix grated butter into the flour mixture until the mixture resembles coarse, pea-sized crumbs.
- Add beaten egg to the mixture and toss to combine.
- Add a few tablespoons of ice water and mix well. If the dough seems dry, add more ice water as needed, 1 tablespoon at a time. Knead the dough until it just comes together when pinched with your fingers (the dough should not be sticky). Divide the dough in two.
- Dust your work surface lightly with Bob's Red Mill Gluten Free 1-to-1 Flour and roll out each portion of dough into a ¾-inch thick disc. Wrap each disc in plastic and chill for at least 30 minutes or up to overnight.
Assembly
- Unwrap one dough disc and place it on a floured piece of parchment paper. Lightly flour the top of the dough and lay a second piece of parchment paper on top. Roll out the dough to about ⅛ inch thickness.
- Cut dough into your favorite shape, rerolling dough as needed.
- Repeat steps 1 and 2 with the second disc of dough.
- Place a heaping tablespoon of chilled raspberry jam in the center of the pie dough cutout. Carefully place a second pie dough cutout on top and gently press the edges together to seal, being careful not to press the jam out of the sides. Use the tines of a fork to crimp the edges. Repeat the assembly process until all the dough is used, laying each hand pie on a parchment-lined baking tray about 1-inch apart.
- Cut a small score in the top of each hand pie and then refrigerate hand pies for at least 30 minutes. Meanwhile, preheat the oven to 400°F.
- When the oven is done preheating, lightly brush each hand pie with heavy cream or milk. Bake until the crust is lightly browned, about 20-25 minutes. Remove from oven and let cool before topping with white chocolate drizzle.
White Chocolate Drizzle
- Microwave Method: Place white chocolate in a microwave-safe container. Microwave at half power or defrost setting for 30 seconds. Stir thoroughly. If not completely melted, continue to microwave at 15-second intervals and stir until smooth. Be careful not to overheat as this will cause the chocolate to burn.
- Stove Top Method: Place white chocolate in the top pan of a double boiler over low heat. Stir constantly until smooth and melted. Do not allow water to boil.
- Place the melted chocolate into an icing bottle with a small tip (this is what I used), a piping bag, or a Ziplock bag (if using a Ziploc bag, cut a very small corner off of the bag). Drizzle white chocolate on raspberry hand pies in a zigzag pattern.
- Serve the finished hand pies!!! If storing, allow the white chocolate to harden before doing so.
Equipment
Notes
Nutritional information should be considered an estimate only; please consult a registered dietician, nutritionist, or physician for specific health-related questions.
Thank you to the Oregon Raspberry and Blackberry Commission for sponsoring this post and for supporting the hardworking Oregon
Disclaimer: All brand recommendations are purely my own opinion and are brands/products that I personally use and enjoy. This post may also contain affiliate links which I may receive a small commission from (without any additional costs to you).
Sandy says
When you were over the other day I neglect to tell you how wonderful these tasted. The crust was so light and flaky. Filling was delish too! Thanks for sharing them with us!
Shannon Emery says
Thank you Sandy! I'm so glad you enjoyed them! And thank for hosting such a fun gathering and for inviting me to be a part of it! ❤️